Followers

Wednesday 20 April 2011

WOYWW98

Hi Wednesday world

Yes wednesday again, the weeks turn around so quickly. It's all craft! craft! craft!. . . . huh I wish it was. Checkout some of the other interesting workdesks on julia's blog .
we all enjoy being a bit nosey! don't we
Anyway wednesday is hot on the heels of  grungy monday, which I make on tuesday, as it's my day off.
 I cleared up at the end of yesterday, very rare I do that, we have visitors at the weekend LOL


I have just finished making some more books using the colour wash spray dies from the grungy monday challenge last week. http://studiol3.blogspot.com/


 I loved using them so I had to make some more for the table top sale I am going to on Saturday. I sort of hope they don't sell because I like them all.


Also on my desk is another nestabilities storage book.  This is a fab way of storing your metal dies using magnets. The first one I made is full up!!!


Anyway GTG Ironing to do .... boring but has to be done.

Tuesday 19 April 2011

grungy monday 4

  well this weeks challenge from linda ledbetter at studio L3   is all about texture fades and distress.
 I must admit this is another of Tim's techniques that I have not tried, there are so many on the web site Tim holtz
checkout the video to see how Tim does it


I decided to make a tag this week as I have just brought Tim's no8 tag for the bigshot. i was feeling a bit pink today, so pink it was.
 I inked up  the music folder with victorian velvet and dusty concord, it looks a bit dark in the photo., it actually quite light, for a change.
 I used the following products; birdcage and bird mover and shapers, kanban bird stamp, cosmic shimmer burnt red lustre embossing powder and papermania paper flowers. Tim Holtz fairytale alphabet.

Wednesday 13 April 2011

WOYWW97


hi wednesday people

time to see those desks again. checkout julia's blog to see what it' all about  julia's stamping ground

lots of stuff on my desk this week.  a lot of work has been done on the kitchen table too. But that had to be cleaned up as it was very messy paint-y stuff  from grungy monday (see yesterday's post).

 here is the result of the pile of knitting pieces..... yes elisabeth, it is from the 'knit your own Royal wedding' book.  i didn't buy the book but my library knitting group are doing it for a display....if you haven't seen it, it is hysterical LOL.are you ready for this girls.... here is the groom


Here is some other stuff i have been doing.
you know the free case you get with ....... busines cards, well it is rather boring so i thought i would have a go at personalising it ... with friendly plastic. it was very quick.
 i cut some pieces to the size of the central panel and heated it with the heat gun. i stamped a simple flower in to the plastic while it was still hot. when it was cold i glued it in place,  i was quite pleased with it. . .  it's different anyway!!
 you have to wait until the plastic has cooled before the stamp will come out, but it does show up.
 the plastic stretched a bit so i curled one corner to make a feature. i also glued some gems around the edge to add a bit of bling.


I have also made some more wire flowers.
the flower on the left is the same as the one i made earlier but the right hand one i made a bit differently.
i pulled the petals out a bit wider and then then twisted them and pulled them into the center
 i think i was trying to get them to look a bit like a dahlia. the centre of each has beads glued in.
 i have been trying a new glue from work it is called  Beacons 3 in 1 advanced craft glue it is crystal clear to start will and glues very well. i may forget to take it back to work !!!! ops sorry vicky.


sunday was such a lovely sunny day it would have been a crime to stay in doors, so i sat in the garden and did some beading. i started this bracelet a while ago but had to leave it to do more important things. time to finish it i think. the base of the bracelet uses the new tila beads (little square tiles with 2 sets of holes  parallel to each other. it also uses the new Swarovski sequins.... very blingy. i saw a pattern similar in the last Beadworkers Guild Journal but i changed it slightly.
 i also made a beaded bead for the clasp.


also still on my desk is the book i made using adirondack colour wash  dyes for the grungy monday challenge. the book looks brown here but it is  really a pinky mauve colour with greeny splodges. this dye is brilliant, i will definately use it again very soon.
anyway time for some  fun peeking at all the lovely desks

see ya soon
janet
.

Tuesday 12 April 2011

grungy monday 3


Hi monday grungers

Have  a look at linda ledbetter's blog grungy monday3. This weeks Tim Holtz challenge caused me a few problems, not least because I didn't have any colour wash. adirondack colour wash
Luckily I knew where I could get some, so I hot footed over there. I brought three colours lettuce, cranberry and stream.
I thought I'd make a flower brooch. From calico I cut out some of Tim's tattered flowers, I stamped them with a script and colour washed them with the lettuce and stream. I didn't really like them they didn't look right on their own, so I gave up on them. nothing was going right today and my kitchen was a real mess, LOL


 I loved linda's scarf so I thought I'd have a go on an old scarf I didn't want any more. I followed the instructions but it didn' t really work, I dont think  I heat sealed it properly. You can just about see the swirley pattern, the colour washed out quite a bit.
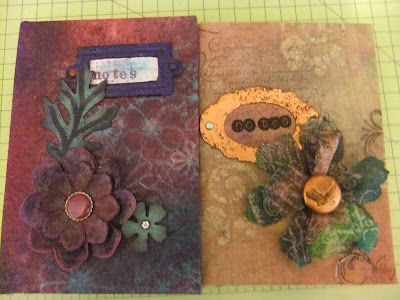
Anyway not to be defeated I had another go on a piece of calico. It's my mums birthday soon so I thought I'd make a note book. Followers of my blog will know  like making books.
Here is the fabric before I cut it up th cover the book.


I used the same stamp as before and all 3 colours and washed it out before I heat set it so that the colour was diluted. It came out quite purple-y. I sprayed the surface with  silver cosmic shimmer mist.

Then I used the flowers I made earlier and added a brad and fixed it to the book cover. I covered a book plate with copper utee to match the brad. I stamped 'notes' on a spare piece of the fabric and put it
inside the bookplate. I stamped some more swirls with stazon and glued some beads over the top.
it took a while but I actually quite liked it in the end.


I dont think i will give the book to my mum though.... too grungy

Saturday 9 April 2011

can you see what it is yet

hi world
here is a bit of the project i have been working on for the knitting group i go to at the library. can you tell what it is yet ? no well it looks like a jumble of odd bits . . .  tune in next
time to find out .... its quite funny (well i think so) and topical.

Wednesday 6 April 2011

WOYWW96


Hi wonderful wednesday peoples
It's that time again and another desk photo. Have a look at the lovely creative desks at WOYWW96
It's been a busy desk this week, (have a look at previous post if you have time). Most of my makes have been cleared away and posted off to the recipients.  All that is except my paper flower brooches from a couple of weeks ago. 


I finished them at the weekend and left them to dry until yesterday when I had room on my desk to sort them out. They are quite interesting but I think I made them a bit  too fussy, they should have had less shapes on each flower. I might try making some more with fabric bonded onto grunge paper and see what happens.


Also on my desk is the tag I made yesterday for Grungy Monday.
This is a Tim Holtz inspired challenge from linda at  studiol3  take a look there is some beautiful art for arts sake!
Actually I was really pleased with the piece I made on  this challenge. Here it is again in case you missed it.


If I dont get around to seeing all your lovely desks .... sorry but as you know there are a lot of you and only so many hours in the blogging day!
see ya

Tuesday 5 April 2011

try grunge monday


Hi world
This week I thought I would have a go at something different. Whilst blog hopping I came across studioL3 who have just started a Monday challenge called Grungy Monday (featuring all things Tim Holtz) have a look here.     studioL3 
You will also need to watch a Tim Holtz video, but come on that's not hard is it. lol
Tim's video


Here is my tag:


I have just brought a set of spellbinders shapabilities called sprightly sprockets. I used it to make the foam stamp (that will be clearer if you watch the video).
 I didn't have any of Tim's medium so I used Golden Medium soft gel, it worked fine but I had to smooth it on the stamp with my finger (bit messy ). The base is a 'liberated' beer mat from an un- named pub!
The embellishments are also die cut sprockets,  except the clock pieces which were 'claimed' from an old clock.
 I usually make floral stuff so I thought why not a sprocket flower, I think it worked quite well. The colours I have used are pine needles, rusty hinge and  a little mustard seed (sounds like pot pourri). I coloured the flowers with the same inks.
I enjoyed making this and will definately be doing more grungy stuff in future

see ya

Monday 4 April 2011

another new home

Hi world
My daughter (no2) moved out a couple of weeks ago, she has moved in with her boyfriend to a lovely roomy flat.
 It's very quiet here at home now with only 1 daughter left.... it's about time the washing machine had a rest lol.

This is the tag i made her to hang in the kitchen.
I made it last week but forgot to photograph it, so had to wait until I went there for lunch today.
The flat is near to where I work so I can walk there in my lunch hour, yay! free coffee.
The background is smudged distress inks on glossy card.  The clock is from lovely elusive images.
The little houses are from crafty individuals and the frame is a Teresa Collins stamp I made as a trial for my image pac stamp maker kit.
The dangly bits are shrink plastic cut out with the big shot.
 The shrink plastic cut very well, I expected it to shatter, don't know why but I did.

Anyway, I think she and Matt will be very happy together.

see ya
janet

Sunday 3 April 2011

mothers day and movers


hi guys
as it was mothers day today i thought i would share my attempts. i am lucky enough to have 2 great mums 1 is my own and 1 is my other halfs. they see each other quite a lot  so we have to be very carefull that they are given the same things so they dont get upset lol. they are great ladies.


i think they are similar enough to avoid a fight ha ha.
the fan stamp is from papermania as is the backing paper. i embossed the fam with glossy black ... my fav of the moment. i made the stamp using my image pac system. (which i have got the hang of now).

i also had to make a couple of new home cards yesterday too. happy moving brian and margaret.


this card is made with a tim holtz die, the houses are great, i cut them out in matt black card mounted  with foam. i used the top cut out piece to create the shadows at the back. the background is simply done with distress inks on shiney card. the moon is embossed with silver.


mum in law asked me to make a card for her to sent
 too, i thought it should be a completely different style to the one i sent. the house was a free stamp from one of the magazines recently. i coloured it in with promarkers. a simple quicky card!
 see ya. .  please leave a comment


Saturday 2 April 2011

so many cards so little time


hi world
i have been away for a few days this week, so the beginning of the week was
a zero crafting time. so at the end of the week i had to catch up and felt like making some cards. i was very impressed with joanne wardles one layer cards in craft stamper this month check out her blog
here  are the ones i made today


the stamps i used here are from elusive images. i have embossed the clock and sentiment with glossy black emb powder. the rest of the stamping is done straight onto the card .... brave eh! actually it was really quick 

the main stamp here is from crafty individuals my fab free stamps for re-newing my subs to craft stamper. only the frank mark is embossed with burnt redpowder from cosmic shimmer.


i have used various stamps here again the main one is from crafty individuals. i have embossed the butterflies onto vellum and cut out and just glued in the middle so it is raised.

i cannot remember who made this stamp except it is german and i got it at artisan last year, i have seen it used on quite a few blogs, it is a really useful stamp. again the frank mark is embossed with gloss black.

this isn't technically a one layer card as i have embossed the inage onto patterned paper and cut it out. i creased the fan to makeit look more ... fan like.
the chinese background stamp is from personnal impressions and the fan is from papermanis oriental collection. i made the stamp to go with it which i used on my mothers days cards (another day).
i really enjoy batch making so it's been a good day
it's nice to read comments so please leave one ta x x